There are three ways you can add Tier 2 suppliers:
Option 1: Add diverse suppliers manually by searching the supplier’s name using the database
Option 2: Add a new supplier manually by uploading their diversity information if not in the database
Option 3: Bulk upload your information via a spreadsheet
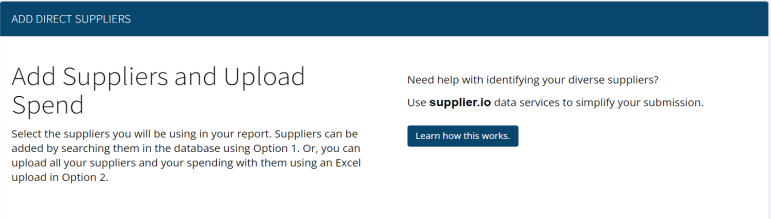
Option 1: Add Diverse Suppliers Manually Using Database

Search for Suppliers
Type the first few characters of the company’s name and a list of suppliers will appear. Select the company and click the “(+)” and it is automatically added.
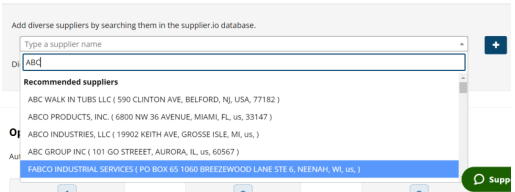
Click the “(x)” to remove the supplier from your list. Click the “Next” button to
submit spend information.

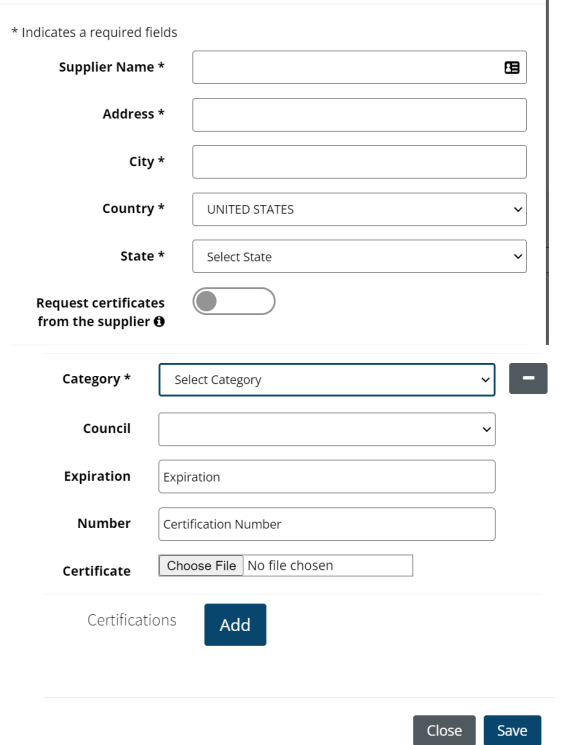
Option 2: If the subcontractor you are looking for is not listed in the database, click the “Add New” button to add a new supplier.

Complete all the required information to add a new supplier to your report. Select the correct category and council when uploading a certificate.
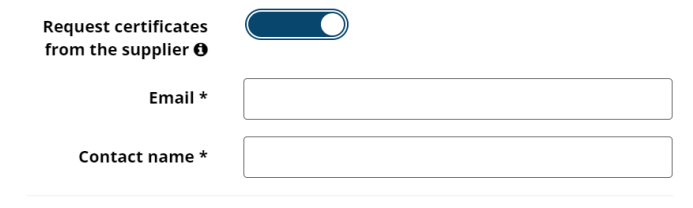
 Enable the button blue to request certificates from the suppliers. Add the supplier’s email and contact name, then hit “Save”. The system will email your supplier requesting to upload their certificate to the system.
 Option 3: Upload List of Suppliers
Upload suppliers and spend information by downloading the Excel file and uploading it back to the system. To download the file, click the “Download” button. This file may request information for some categories that your customer does not require and ignore those columns. Provide name, address, city, state and at least one diverse category to upload the list properly, otherwise, the system will give you an error. You may add spend in the last column.
Option 3: Upload List of Suppliers
Upload suppliers and spend information by downloading the Excel file and uploading it back to the system. To download the file, click the “Download” button. This file may request information for some categories that your customer does not require and ignore those columns. Provide name, address, city, state and at least one diverse category to upload the list properly, otherwise, the system will give you an error. You may add spend in the last column.
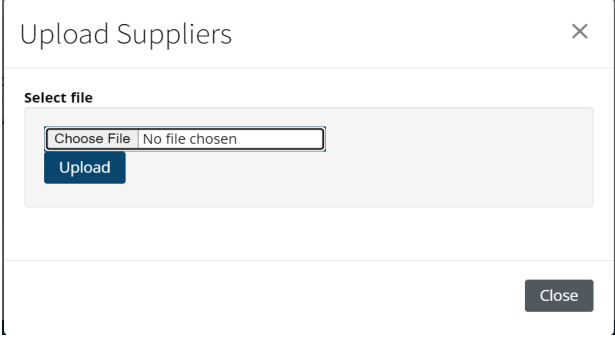
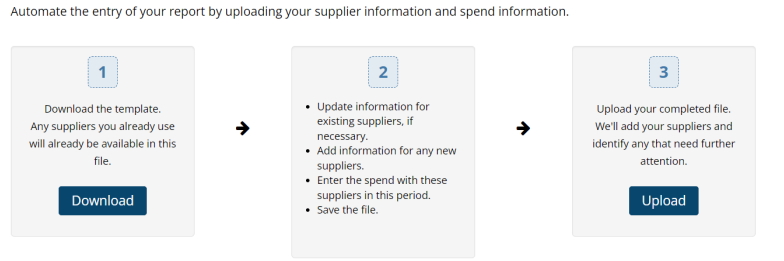 Once the file is complete, save it as a .csv file, and do not make any format changes to the file. Upload the file by clicking “Upload” on step 3. Scroll to the bottom of the page after the system uploads to see all the records.
 Correct Unverified Suppliers
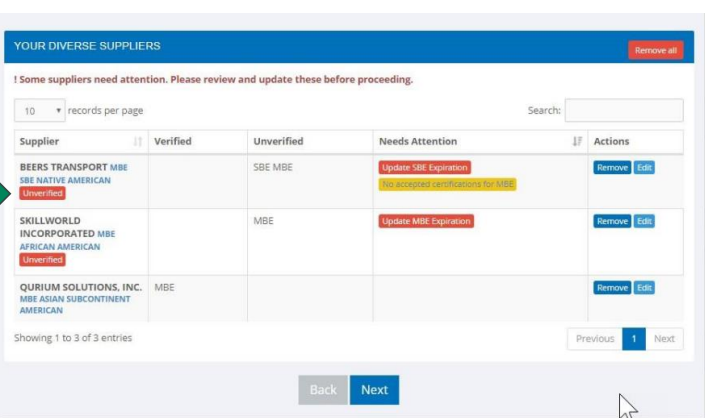
If there is missing information needed for a supplier, the system will tag it as Unverified. Click the “Unverified” tag to give you more information on why this supplier is considered unverified. You may clear the error tags on the Needs Attention column. Click the red or yellow tag to provide missing information.
Correct Unverified Suppliers
If there is missing information needed for a supplier, the system will tag it as Unverified. Click the “Unverified” tag to give you more information on why this supplier is considered unverified. You may clear the error tags on the Needs Attention column. Click the red or yellow tag to provide missing information.
 After the certificate is uploaded, it will go through an internal process for validation. The spend that is entered into the system will be labeled as Unverified spend until the validation process is complete. Certification approvals can take up to 14 business days. If the supplier’s certificate is not approved by our internal team, the spend will remain under unverified and the person who uploaded the certificate will be notified.
Once certificate approval has been received, you will need to go back and edit the supplier and resubmit the spend for the current reporting period, so it shows Verified.
If you are not the person who uploaded the certificate, check back into the system before the reporting period closes. If no changes are made before the reporting period closes, then the spend will remain unverified for the current reporting period. Future reporting periods will show the spend as verified.
After the certificate is uploaded, it will go through an internal process for validation. The spend that is entered into the system will be labeled as Unverified spend until the validation process is complete. Certification approvals can take up to 14 business days. If the supplier’s certificate is not approved by our internal team, the spend will remain under unverified and the person who uploaded the certificate will be notified.
Once certificate approval has been received, you will need to go back and edit the supplier and resubmit the spend for the current reporting period, so it shows Verified.
If you are not the person who uploaded the certificate, check back into the system before the reporting period closes. If no changes are made before the reporting period closes, then the spend will remain unverified for the current reporting period. Future reporting periods will show the spend as verified.